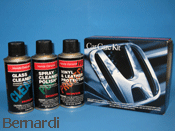
As a proud Honda owner, you understand the value of maintaining your car’s interior. To achieve a spotless, well-maintained cabin, it's essential to follow the steps to detailing a car interior thoroughly. This guide will show you exactly how to use a car interior cleaning kit step by step, ensuring every part of your Honda’s interior gets the care it deserves.
Benefits of Using a Car Interior Cleaning Kit
A specialized car interior cleaning kit is essential for maintaining the comfort and cleanliness of your vehicle. Unlike generic products, these kits provide a comprehensive set of tools tailored to different materials—upholstery, leather, vinyl, and plastic—all designed to preserve your Honda’s interior.
- Cost-Effective: Buying individual products can be expensive. A cleaning kit is a convenient, all-in-one solution that saves money in the long run.
- Specialized Products: Kits come with specific cleaners for different surfaces, ensuring that no part of your interior is damaged by harsh chemicals.
- Time-Saving: With all the necessary tools and instructions included, you can streamline your cleaning routine.
What to Look for in a Car Interior Cleaning Kit
When selecting a car interior cleaning kit, make sure it covers all key areas of interior detailing:
- Carpet Spot Remover: Removes tough stains from carpets and floor mats.
- Glass Cleaner: Provides a streak-free shine on windows and mirrors.
- All-Purpose Cleaner: A versatile cleaner safe for dashboards, vinyl, and plastic.
- Leather Cleaner or Wipes: If your Honda has leather seats, this is essential to keep them conditioned and crack-free.
- Microfiber Cloth: Perfect for dusting, cleaning, and applying solutions without scratching surfaces.
Look for eco-friendly and non-toxic products to protect your car’s interior and the environment.
Step-by-Step Guide to Detailing a Car Interior
- Step 1: Gather Trash and Debris
Start by removing any personal items, trash, and large debris. Empty out storage areas, including cupholders, door pockets, and the glove compartment.
- Step 2: Vacuum the Seats, Carpets, and Floor Mats
Use the vacuum cleaner and its attachments to thoroughly vacuum the seats, carpets, and floor mats. Focus on the seams of the seats and hard-to-reach corners. Remove the floor mats and set them aside for deeper cleaning later.
- Step 3: Clean and Shampoo Floor Mats
Shake off any loose dirt from the floor mats, then use a carpet spot remover or shampoo for a deep clean. Scrub gently with a brush, then let the mats air dry.
- Step 4: Dust and Clean Dashboard and Other Surfaces
Apply the all-purpose cleaner to the dashboard, center console, and other hard surfaces. Wipe these areas with a microfiber cloth, using a soft-bristle brush to get into crevices around buttons and vents.
- Step 5: Disinfect Commonly Used Surfaces
Focus on high-touch areas like the steering wheel, gear shift, door handles, and seatbelt buckles. Use a disinfectant or an all-purpose cleaner, followed by wiping with a microfiber cloth.
- Step 6: Clean the Windows and Mirrors
Spray the glass cleaner on all interior windows and mirrors, wiping in a circular motion to avoid streaks. Don’t forget to roll the windows down slightly to clean the top edges.
- Step 7: Clean and Condition Upholstery
For Fabric Upholstery: Use an upholstery cleaner and soft brush to scrub the seats.
For Leather Upholstery: Apply leather cleaner or wipes to the seats and other leather surfaces. Condition the leather afterward to keep it soft and prevent cracking.
- Step 8: Clean Cupholders, Console, and Door Panels
Use a detailing brush and your all-purpose cleaner to get rid of dirt and grime from small areas, like cupholders, console, and door panels.
- Step 9: Deodorize the Interior
Eliminate odors with an interior-safe deodorizer or baking soda. Make sure to target any lingering smells, particularly in the upholstery or carpets.
Pro Tips for Best Results
- Always test any cleaning product on a hidden area first to ensure it won’t discolor or damage the material.
- Perform your detailing in a shaded area to prevent cleaning solutions from drying too quickly.
How Often Should You Detail Your Car’s Interior?
For a spotless car interior, consider using your cleaning kit for a full detail once a month. For high-traffic areas, such as windows or the seats, clean as needed when you notice smudges or stains. A quick weekly wipe-down with a microfiber cloth can keep your interior looking fresh between deep cleanings.
Conclusion: Follow the Steps to Detailing a Car Interior for a Pristine Honda
Maintaining your car’s interior is essential for preserving both the aesthetics and value of your Honda. By following these steps to detailing a car interior and using a high-quality cleaning kit, you can keep your vehicle’s interior looking new and feeling comfortable. Invest in the right tools and products to enjoy the benefits of a clean, well-maintained car. For premium cleaning kits and accessories, visit Bernardi Parts Honda today.
Related Articles